Saturday, December 15, 2012

Winter Wishes and Soapflakes

 I had a gift exchange with some friends and since I started this little thing earlier this year, I decided that I should kind of continue it for everyone.  I made them soapflakes and a little picture with instructions to set next to it on a sink in their home.


Here is what I put in each package for everyone, a bowl of soapflakes and a picture frame with the instruction poem.
I made this from a photo I saw of a card Joy Kennedy posted on her twitter account.  I LOVED it and decided to kind of try and duplicate it for my instruction poem.  I call it an instuction poem, because people don't know that the snowflakes are coated in soap and can be used to wash their hands.

To make this card, I embossed a 4x6 piece of Kraft Core Cardstock with the snowflake texture fade folder and then sanded the snowflakes.  I stamped some white cardstock with the blueprint snowman stamp in black archival ink.  Then using some Distress Markers and water markers, I colored the snowman, inked the edges with frayed burlap distress ink, and then you cant see it, but I covered the snowman with rock candy distress stickles for a little shine.  I printed the poem on white cardstock and backed it with more Kraft Core.  To make a couple of the words stand out, I drew around them with my Distress Pens.
I bought a package of fabric rose petals from the dollar tree to make the snowflakes.

Then I cut snowflakes out of the petals using Tim Holtz movers and shapers dies.


After dipping them in glycerin soap, I had soapflakes. 

For a detailed tutorial on how to do this, I posted a step by step tutorial on Instructagram
Then I packaged them all up in a large lunch bag, topped it with a large doily, Tim Holtz rosette snowflake, and made some tags out of the old Making Memories metal tag maker and stamped one of the mini blueprint snowflakes on it.

Saturday, December 1, 2012

Jingle Jangle Jamboree Tag

I promised a Disney tag RAK to some friends over on Disney Scrappers, and I wanted to make one that will easily go on a Disney Scrapbook page.  One of the friends is here in So Cal and goes to Disneyland often, so I felt safe making a tag that will go with pictures taken at the Jingle Jangle Jamboree back in Big Thunder Ranch in Frontierland. 
 I used a #8 kraft tag and did the Tim Holtz Distress ink and texture fade embossing technique to make the tag look like distressed wood.  Then I cut out the title using Echo Park's This and That paper and Tim Holtz Inside Out alpha die. 
 I'm going to be honest here -- Sizzix, the ejection foam you use on these detailed dies really sucks.  It was a complete and total pain cutting these letters out!  And it is such a simple alphabet. COME ON!  You are a premier die maker, you should have developed a sturdier ejection foam by now!  I don't know if this is due to manufacturing in China and getting crappy quality, or what, but this is not the first of your dies that I have noticed has this problem.  You really need to get this fixed.  And while I am on my quality rant, please bring the manufacturing back to the USA.  You can do it and it is so much easier to monitor quality control and shipping problems.
I used the left over quilted paper from my last entry, to cut another ornament shape and then decorated it with an old holly punch, a tiny jingle bell, and just the letters from the Inside Out alpha. 

I made a complete tutorial on how to make this tag, including the wood grain tag on Instructagram.  You can see the step by step directions here.

This was such a fun little tag to make and I can't wait to use it on a layout.  Yes, I know I said I made it for a friend as a RAK, but, well, I made TWO of them so I could have one too!  ;-D

Wednesday, November 28, 2012

Just Before Takeoff! Echo Park Contests

I made this layout and the quilted embellishments for two Echo Park Paper Company challenge contests.  One was to make a project using one of their current Christmas lines.  This layout was made using This & That 6x6 paper pad.
I love this picture!  We took it at Disneyland back in the Big Thunder Ranch area just before Santa took off for the big flight.
This layout was based on Sketch Savvy Sketch #91.


 All of the shapes are Tim Holtz die cuts, the holly, ornaments, #25, and title shape. The title font is an OLD QuicKutz font that I like for "country" style layouts called Khaki. 
The second challenge contest was to make a tutorial using Echo Park paper and post it on a new site called Instructagram.  I did that earlier this week. My tutorial was a step by step guide to making these quilted paper ornaments.  If you would like to know how to make these ornaments, check out my tutorial on Instructagram!


Wednesday, November 21, 2012

Storyteller's Critter Breakfast Layouts

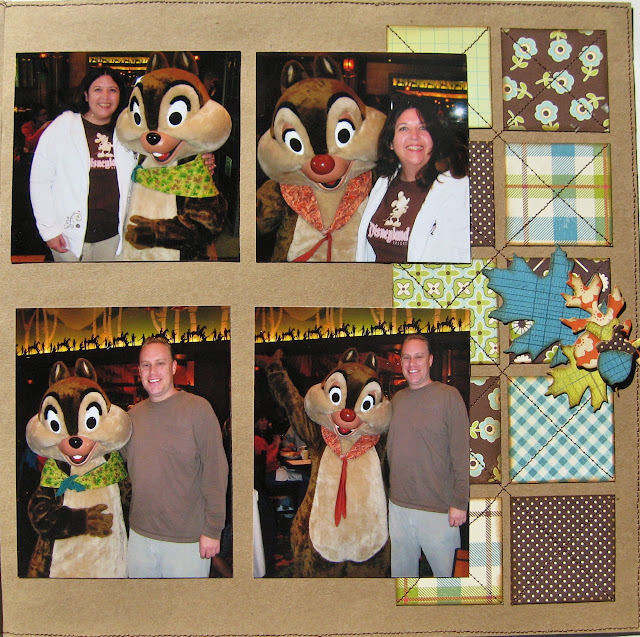
We LOVE the Critter Character Breakfast at the Storytellers Cafe in Disney's Grand Californian Hotel. Both of these layouts are about our first time experiencing it for my birthday in 2009 during Disney's Year of Celebrations.
Both layouts done with various October Afternoon papers, and a teeny bit of Cosmo Cricket paper (the blue gingham) and MME (green title and photo mats).
This two page layout was based on Sketch #61 from Sketch Savvy.  This is a one page sketch that I turned into a two pager for my Disney Club.


For the title, I cut 3 layers of thin chipboard and cardstock out with my QuicKutz alphas and then layered them to make the words "having a" stand out.  The words "Wild Time" are very old chipboard.
 For the different embellishments, I cut out burlap in several colors, and then dyed some of the white burlap with blue Distress Stain so that there were some blue bits too.  In order to make embellishments without the burlap disintegrating, you have to iron on interfacing before you cut it.  I used Tim Holtz Tattered Leaves dies and Movers and Shapers dies for these pages.


To add some texture to the burlap pieces, I attached them to the page and then poked holes where I wanted the veins to go, and hand sewed with linen thread.  Yes, it took forever, but I like it.


This layout is based on Sketch #62 from Sketch Savvy and I made it into a two-pager for my Disney Club.


This is the second layout about our Critter Breakfast. This is also October Afternoon paper, the same Tim Holtz dies, but cut with paper on this layout. The solidish cardstock papers are from Bo Bunny and MME. 
For a little texture, I cut additional acorns from chipboard, layered them and then put the colored cardstock on top. A Chip and Dale layout must have lots of acorns on it! 


For one of the challenges on Disney Scrappers, we were to journal on a layout about the What, Where, How or Why of our Disney Vacation.  Since we are AP holders and live within an hour of Disneyland, we don't really take Disney Vacations, but we do visit often and we usually have a why to our Wheres, so my journaling reflects that on these layouts.


Here are some of the reasons why we love Storytellers. 

Tuesday, November 13, 2012

Matterhorn Bobsleds meet Graphic 45

Another layout for Disney Scrappers.  This layout fits several challenges over there: Veterans Weekend Challenge #4 - Inspiration, Disney Color Challenge #3, and Disney Challenge #11.  We are having a lot of fun over there, so please stop by and see what we are up to and get inspired!

This started out first as a layout to fit the color challenge #3.  Here are the colors:
You can add any additional color, so I chose green, and you do not have to do Pirates, that is just the inspiration photo.  I searched my paper stash and found nothing for this color combo until I started digging through my Graphic 45 papers.  I put several paper lines together to come up with this color combo, but I think it works.
Next, I decided I wanted to follow one of Susan's sketches and decided on a two-pager that she did for Basic Grey.  I know, a Basic Grey Sketch using Graphic 45 paper, but oh well!

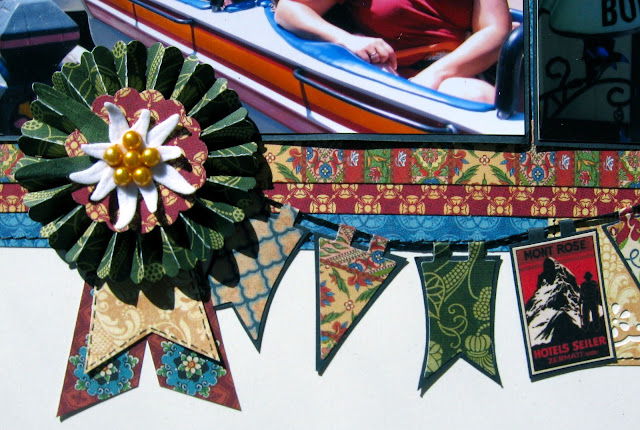
The Graphic 45 lines I used on these page were, primarily Renaissance Faire, the stamps were from Transatlantic, the gold from Le Romantique, and the red from Fashionista.  Glad I had so many lines from which to mix and match!!

  For the Inspiration challenge, you had to pic something from the photo to use for inspiration so I chose a rosette and pennants.  I loved that the Graphic 45 Transatlantic had these postage stamps that actually had Switzerland on them AND the Matterhorn!!  Wow!  I added my own postage stamp of the edelweiss.
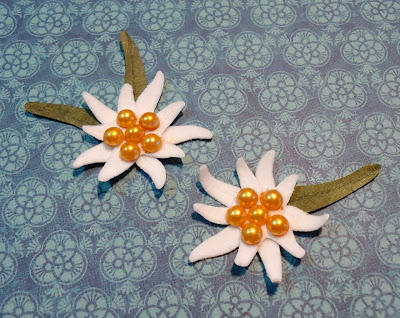
I decided I wanted to make some edelweiss to put on this layout.  At first I tried to find some at my LSS and online, but there were none to be found, so I put on my crafty thinking cap and got to work.
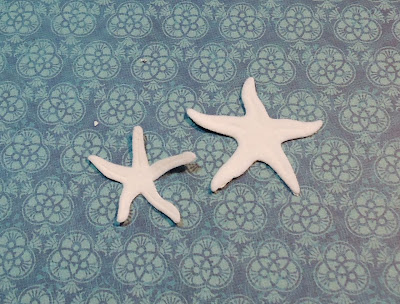
I started with some old Bo Bunny white felted paper, and cut out two QuicKutz starfish. Weird, starfish, but the shape looked edelweissy to me.
 Then I carefully trimmed around the edges of one of them to make it a tiny bit smaller.
Then I layered them, hand cut some thin leaves from green paper, and the last step was to alcohol ink some pearls for the centers.  Ta da!

Celebration Round-up Big Thunder Mountain Ranch

This layout is also for the Disney Scrappers Veterans Weekend Challenges.  I did this layout a couple of years ago for my Disney Club.  I used some K& Co. paper .
This particular layout was for Veterans Weekend #5 - Map it!  You had to use a map on the page somehow.  I will explain my use of maps below.


We celebrated July 4th at the Big Thunder Ranch BBQ Round-up in 2009.  Because it was the year of celebration,  after lunch they would bring a cupcake in a cone in their big celebration cupcake holder.  Very colorful and very fun!  We got the chocolate toffee cupcake.

On this side I have my journaling and a picture of the piano player.  They have a little singing going on during your meal and even get a little crowd participation too.

 This is one way that I used a map on my page.  I had to shrink down the front of the Celebrate Today! maps they had for the year.  Then I put it in a vellum pocket with some Mickey confetti that I made.  The Mickey shape with the Mark Twain was also punched from the map.
The title section has more Mickey confetti, and more Mickeys punched from the map, including the Big Thunder Ranch area on the ear.  The title on this page was made with Quickutz  Katie Grand.  

I added more map Mickeys around the journaling area.  And yes, I did make my flag ears!  ;-D

If you haven't yet, stop by Disney Scrappers and check out our Veterans Weekend Challenge -- it is open until Sunday, Nov. 18th!

Buzz, Gadget and Officer Calvin Blue

 We are having a Veterans Day Weekend challenges over at Disney Scrappers and we have extended the deadline through Sunday, Nov. 18th at midnight PST.  These three layouts are for some of the different challenges over there.  I grouped them together because they are samples from kits I made from really, really old paper. 
For Veterans Day Challenge #6 - Scraplift.  I scraplifted a two-age layout for this one. This Buzz Lightyear layout uses old Karen Foster paper, QuicKutz Metro and Diesel Fonts and shadow (I punched WORLD to make it look spacey), a Tim Holtz texture fade on the triangle shapes.  I added a little bit of MME paper to this kit as I had some left over from a layout I did a few years ago.
This layout is for Veterans Weekend Challenge #3 - Chevrons.  I made the chevron border by welding a bunch of chevrons together in SCAL.  Gadget's Go Coaster is on of our favorite rides in Toon Town.  This layout features the ride and Gadget's blue prints that are approved by Mickey.  DH loves that!
 Lots and lots of Tim Holtz gears on here, and Quickutz arrows.


This layout is for Veterans Day Challenge #1 - Stars.  Lastly, this layout features some really old Rusty Pickle and ???.  The plaid is old and I don't know who made it. This is from  July 4th 2012 when my DH met Officer Calvin Blue on Buena Vista Street in DCA and he was cited for being a good recycler.  Hahaha!  I'm going to do a two-pager of this later on with more pictures and the citation, but I thought this layout was perfect for getting the main photos scrapped quickly.

Wednesday, October 24, 2012

OFF!


 Graphic 45 is having some Facebook Contests this week and one each day is to make something.  Yesterday it was a card, but I didn't have the time to make it.  Today it was to make a tag.  You have to have the project finished by 12 EST -- 9pm here.  I think I got it in just under the wire tonight, but didn't win.  Anyway, here is my tag.
I used Graphic 45 - Halloween in Wonderland paper from last year.  I decided this would be a good embellishment for a page with a picture of me and DH with the Queen of Hearts at Disneyland's Halloween Time.  The red was really hard to match, and it looks better in person, but I tried to "paint the roses red."

Tomb Sweet Tomb

I have been enjoying making Halloween gifts for friends recently.  It all started with the adorable Tim Holtz card kit that a friend brought to me a couple of weeks ago.   I made all 12 cards and then got inspired to make a few gifts to go with them.  The previous blog entries have some of them, and today I am going to focus on some of the paper quilt wall hangings I made for two friends of mine who are exceptionally creative and fellow Disney maniacs.
 First, I altered the Tim Holtz tombstone card by adding stickle Mickey ears to the bat.  :-D
 Now on to the quilt wall hanging. This is an idea I got from Susan Stringfellow a couple of years ago.  I cut 1.25" pieces of Authentique Halloween patterned paper, crinkle them, adhere them to the background cardstock with a glue stick, and then sew across them for added texture.
Then I cut out these Hitchhiking Ghosts from Disney's Haunted Mansion.  I printed them onto paper from Disney Family.com, and cut them out in 1-D.  Then printed them onto vellum for the project.  You can find them here. Do you know the names of the Hitchhiking Ghosts?
Then I wanted a sign like the one in the hallway at the Haunted Mansion, so I just graphed this one, crosstitched it and then framed it with paper.


 Tree was made by attaching some dark brown paper to black cardstock with Claudine Hellmuth Multi-medium Matte.  Once it was dry, I inked it with Black Soot Distress Ink and die cut it with a Lifestyle Crafts tree die.  The graveyard and tombs were cut from some old wrinkled paper I had from ages ago.  No idea who made it.  Die cuts were also Lifestyle Crafts.  The fence was cut from black chipboard using a crooked fence die from Sizzix.

And there you go -- I really had such a great time putting these together! 

Oh!  And The Hitchhiking Ghosts are named Phineas (with the bag), Ezra (tall) and Gus (beard).