Sunday, December 6, 2009

Tim Holtz 12 Tags of Christmas 2009!


If you haven't already been following Tim Holtz on his 12 Tags of Christmas for 2009, you are definitely missing out! As always, they are fabulous and challenging. I have been making a list of all the supplies and gathering things I need so I can give all 12 tags a shot this year.

As usual, it is a little busy in December, but I really wanted to make time to try and do this if I could. Since several of my scrapping friends are interested in giving this a try, we decided it would be fun to try it together and to kind of spur each other on. So, we're all getting together at my house next weekend and having a Tim Holtz 12 Tags of Christmas Extravaganza! (it will probably be more a chaotic mess of distress, but it will be FUN!)

As soon as I start getting them done, I will post them for you to see.

If you haven't already - click the logo above and head on over to Tim's blog to check out his tags. and while you're at it, leave a comment. You just may win something from him. I did!!

Tim Holtz Twelve Tags of Christmas 2009


I only got 9 of the 12 tags of Christmas completed, but I think that is still pretty good! Below are the pictures of my Twelve tags. I tried to follow Tim's examples as closely as I could. Be sure and stop by his blog to see the amazing originals!

Tag #1

Tag #2

Tag #3

Tag #4

Tag #5

Tag #6

Tag #7

Tag #8

Tag #9


Monday, November 16, 2009

An Album for Malachi

My friends Wes and Rachel had a little boy, Malachi, who was battling a form of leukemia. Almost three weeks ago he quietly passed from his mother's arms into the arms of Jesus. He had a wonderful smile and his mom posted so many adorable pictures of his happy face on her blog that I really wanted to make an album for Malachi and Wes and Rachel so that they could cherish the wonderful memories they had with him. This was a task I knew I could never complete alone, so I called on my scrapbooking friends, some of whom called on their scrapbooking friends, and together, we made this album of memories for Kai's family.


Many thanks to the ladies who contributed pages to this album.
Sandy Kim Tiffany Noli Janice R Suzy
Janice L Susan Sue Colleen Dawn Alisa
Linda Allison Brenda Jan Terry Heather

Kai had an amazing way of affecting people he never even met with his sweet spirit, and Wes and Rachel touched many people they never met with their strength and courage. If you would like to read more about Kai and his journey, please visit their Caring Bridge site and follow their story there.

Sunday, November 8, 2009

More Halloween!

I am always so inspired by Disneyland's Halloween Time decorations, especially the ones on Main Street, that I took lots of pictures last year and decided that I wanted to try and replicate some of them in my own home. I had several parties planned for different things here at my house, so I figured that this was the best year to give it a try!

Not only did I decorate for Halloween, but I made name plates, a mini book and some treat giveaways that I learned to make from a friend who has a CTMH business. (Thanks Janice!)

First, here is the mini book I made using Tim Holtz Distress inks and crackle paints, QuicKutz dies and Teresa Collins bracket book covers and Halloween die cut pages. It was such fun to make and we even used the Bind-it-All to put it together.


I made place cards for everyone with the QuicKutz Haunted House die and Haunted alpha, abd my friend Noli made the treat bags.


I learned to make these adorable treats from my CTMH friend and consultant, Janice. Rather than stamping, I added the vintage postcard to the front of the treat (I used several different styles of postcards) and then in various spots, for a little shine, I added some Rock Candy Distress Stickles. It looks like that old glass glitter.


When you open the folder, the treat pops out! So cute and fun!


Now for the decorations. I wanted to keep that vintage Halloween feel, so i continued with the antique postcard theme, just like Disneyland.
Here is this year's front door wreath....but I already have plans to change it for next year.


This is the wall over the entrance table as you come in the door.


Coffee table in the living room.


And I didn't make this, but I found this adorable pumpkin at Vons! Couldn't pass it up, so I included it here b/c it is just so darn cute!


Well, that was it for my Halloween decor for this year -- but you know me, I'll be adding to it next year!

Monday, October 5, 2009

Disney's Halloween Time!

I decided that I needed to plan some Halloween Time Disney pages because I have so many Halloween Time pictures, so here are two I finished this month. I had a couple of problems, one being that some of the paper I ordered from this Making Memories Spooktacular Halloween line didn't come in, so I had to come up with an alternative for it. I have the techniques I used at the end of this post, but for now, here are the two layouts I came up with.


For this layout, I borrowed the tag design from Tim Holtz's Technique Challenge for October 2008.


I didn't want to use ribbon for the tag, so I dyed some cheesecloth using Ranger products. I also got inspiration from a funny layout by my friend Susan Stringfellow. She used google eyes in a circle on her layout about antique fake eyeballs. I loved it and wanted to used it on a Halloween layout, so here is my version of her google eye circle.


The second layout uses some of the new Halloween QuicKutz. The title and adorable curved swirly border and from QK. The rest of the embellishments are either stamped, or the ticket I created on my computer using Microsoft Word.


The medallions on both pages were made by adhering circles to colored paper clips and then tying some dyed cheese cloth to the tops of each.


Because part of my paper didn't come in, I had to adapt. So, I ran to JoAnn's and found this wedding paper. I got out my Ranger Distress Inks and inked the paper so that it looked dramatically different once I was finished.


And just like that, wedding paper becomes Halloween paper!


Then I needed some colored cheese cloth for my tags on both pages. I used Adirondack ColorWash to dye the white cheese cloth, then as I dried it with a heating tool, I spritzed it with Ranger Distress Re-inkers to add depth to the color and to make them look a little more uneven. I loved how they turned out.


Supplies:
Making Memories, Ranger Distress Inks, Adirondack Color Wash, QuicKutz, Cricut (Arrr Matey font), Martha Stewart edge punch, Stamps - Close to My Heart, Inque Boutique - Darice, Tim Holtz - Stampers Anonymous, cheese cloth, paper clips, google eyes

Saturday, August 29, 2009

A Very Merry UnBirthday to YOU!

I put some of my QuicKutz to use and made this fun pull out card. I learned how to make this card several years ago when I was in Not Your Ordinary Bookclub.


It's a pop up card, so when you pull the bottom of the navy strip, the top pops up to reveal this candle with the tag that reads "Wishing you a..."


then the inside of the card finishes the sentiment with "...Happy Birthday."


Supplies:
Basic Gray Lime Rickey (and a strip of Two Scoops)
Martha Stewart white opaque pen
Fun Foam
QuicKutz used:
CARD:
Cake REV-0159-S
Candles REV-0156-S
Happy Birthday REV-0157-S
QuicKutz Club Tab - QC-0015
QuicKutz Club Tag - QC-0016

Monday, August 10, 2009

Hello Friend - Basic Grey Challenge #1

Okay, unlike my last post, this is the real deal! I actually used Basic Grey paper and a Basic Grey Brad for this card so it fits the challenge.

We were to make a card using mostly Basic Grey product and we were to follow this sketch.

I used Basic Grey Eve Collection for my paper and an Eve brad in the middle of the flower.


The flower is cut from actual sewing patterns using 3 different sized scalloped circles. I attached them through the center and then crinkled them and spritzed them with Tattered Angels Glimmer Mist in Sherbet and Scarlet. I got the idea from Annabelle at Bits and Pieces.

I also spritzed the BG pink paper with some glimmer mist so it coordinated with the flower. The BG letters, flourishes and the leaf were all covered with Ranger Crackle Glossy Accents.


Supplies:
Paper: Basic Grey Eve
Cardstock Base: Bazzill
Brad: Basic Grey Eve
Letters and Flourish: Basic Grey Eve
Ribbon: May Arts
Flower: Sewing Pattern, Tattered Angels Glimmer Mist

Sunday, August 9, 2009

How Oar You? and Happy Camper

I decided I wanted to try and do the new and improved Basic Grey Challenge. They posted this sketch for us to follow for this week. The only rules are that it needs to be a majority of BG product.


Well, somewhere between me printing off the sketch last night and waking up this morning, it took on a life of its own. I ordered a bunch of Cosmo Cricket paper a few months ago and they sent me some fun little packets of paper scraps, ribbon scraps, and a few chipboard elements. I already used the Halloween stuff in a card in an earlier post, but I had a packet left with camping stuff from their Mr. Campy line. I was baffled by this packet as I couldn't think of what kind of card you would give to someone who was going camping. And on top of it, one that uses chipboard oars. Who uses chipboard oars?

I went to bed with this sketch in mind and that packet of goodies (even though I knew it was supposed to be a Basic Grey card, I couldn't get that little packet of CC camping stuff out of my head.) Guess what? Sleeping on a problem sometimes works out! I woke up this morning with a card all worked out that I can give to anyone, anytime!

Here it is!


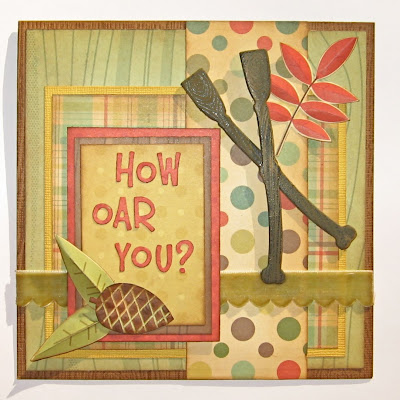
For the wood grain (it's hard to see in the picture) on the oars, I stamped the black chipboard with clear embossing ink, then embossed with clear embossing powder, then covered with paint and once it was partially dry, I wiped the paint off the embossed areas, leaving the paint in the areas that were raw chipboard. I learned this technique from Tim Holtz, but saw my friend Susan use it on these very same oars on a layout she did.

Now, I have to go back to my room and make a Basic Grey card to fit the challenge so I'm in the running to win some prizes.

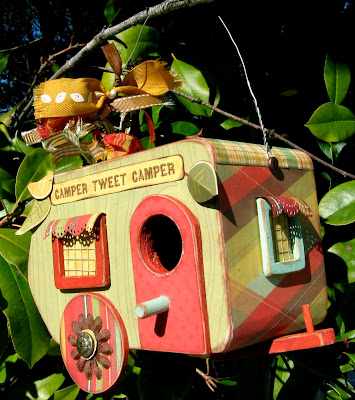
Awhile back I also decided to copy an adorable camper that my friend Susan made. When I say copy, I mean! Mine is almost exactly like hers, so click the link and check it out! But I love it.

Here is my Happy Camper birdhouse made with Mr. Campy and a camper birdhouse from Michael's.
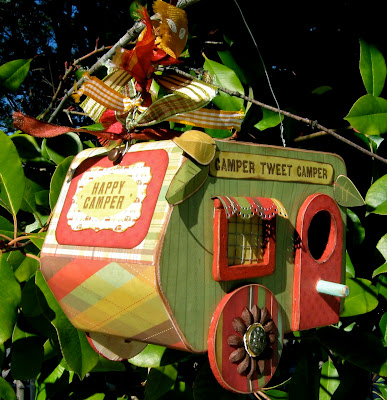


Supplies:
Patterned Paper: Cosmo Cricket "Mr. Campy"
Cardstock: Bazzill
Ribbon: Cosmo Cricket
Chipboard: Cosmo Cricket
Font: QK Chicken Noodle (limited edition)
Stamp: Hero Arts Wood Grain
Ink: Ranger Vintage Photo Distress Ink
Paint: Adirondack Paint Dabbers (Espresso and Butternut)

Monday, August 3, 2009

Soarin' Over California


This one I think I'm just going to leave as is. It turned out a little busier than I was planning, but I was having so much fun making propellers and cutting arrows that I just couldn't stop.


All the pictures here were taken without a flash, and the CM said I could take them (unlike the first time I rode the darn ride and they chastised me for taking pictures without a flash.)


The tag, gears, and propellers were cut with QuicKutz dies using QK self adhesive metal and painted with Ranger crackle paint in Shabby Shutters and Fired Brick colors.


The small propeller is a QK flower and the large propeller is the handle of the hammer (cut 3x) I made the centers by punching circles from the metal and cutting to the center, then folding it back on itself to form a cone.


Supplies:
Paper - Cosmo Cricket "Get Happy"
Ranger Crackle Paint - Shabby Shutters, Fired Brick
QuicKutz-
Metal Sheets
Gears 0340
Hammer 0443
Flower 0376
Tag REV 0015
Embossing Folder GBP-REV-003
Arrows (Archiver's Exclusive) C-0049
Dots Border CC-BDR-007
Squares & Dots Border CC-BDR-013

Saturday, August 1, 2009

Ticket 2 Drive


These are some pages I have in the works. I usually don't post them in this state as I like to go ponder them, then go back and add some additional embellishments or things I have from my stash, but sometimes you just have to call it done, you know?

I was inspired by this layout from Two Peas in a Bucket and turned it into a two page layout with a different theme. After it is all said and done, I like the original better than mine, but it was fun to take something and try to change up the theme a little!

Anyway - here is one two-page layout that I just finished for Autopia.


I wrapped metal wire around the circles instead of the string in the inspiration piece.


Instead of the buttons used in the inspiration piece I used metal charms are from Karen Foster and I cut off the top loops and sanded down the edge so they didn't look like charms.


Journaling about our fun "Girl's Day" at Disneyland.


Supplies:
Cosmo Cricket - Get Happy paper
Karen Foster Charms
Tim Holtz Journaling Ticket
QuicKutz Zelda Grand for title
Black Soot Distress Ink