Sunday, May 31, 2009

Baby Buggie Favor Boxes


I made these for a friend's baby shower. I found the design on Denise's Scrapbooking, a blog that showcases free and affordable SCAL designs for the Cricut. She had designed four or five baby items that could be used for table decorations or favor boxes at a baby shower. My mom and I purchased the set for $5 and Mom cut them out for me on her Cricut Expression. I then assembled them and decorated. It was a lot of fun, and once the original buggie was decorated, the rest were easy. It took me 3-4 hours for these.

For decorating, I used lots of odds and ends of lace, trims, buttons and ribbon. I even added some sequin butterflies to go with her nursery theme.

Monday, May 25, 2009

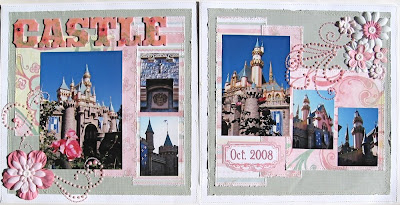
Sleeping Beauty's Castle


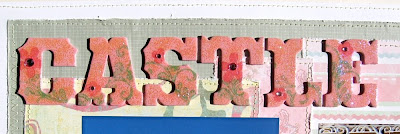
Did I ever have fun with the techniques on this one! My friend Susan has a fantastic scrapbooking blog and she often posts tutorials based on the techniques she uses. That is how this page got it's start. I read her "Make Your Chipboard Shine" tutorial found here. (you have to scroll down a few entries to find it) Then I purchased some Cosmo Cricket Sweet Mix chipboard letters and got to work. The paper is Melissa Francis, and I used Inque Boutique stamps instead of the Basic Grey stamps shown in Susan 's tutorial.


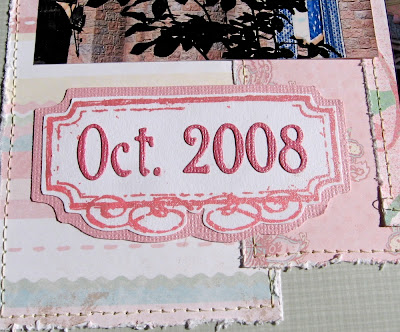
Then it was on to the second page. I think embellishing page two is often more difficult because you don't have a title to take up space. But I think the Prima Say it in Pearls embellishments really did the job! I wanted to document when I took these pictures of the castle, so I figured a stamp border and some Quickutz letters would be just the thing, but the stamped border needed some shine. That is when Tim Holtz came to the rescue with his current blog technique. He stamped with distress ink and then just wiped perfect pearls over the stamp and brushed off the excess. It gave the stamped image a pearly look that was perfect. You can see Tim demonstrate his technique here.


You can barely see the shimmer of the border, then I backed it with Bazzill bling and cut the letters out in Bazzill Bling.


Really fun techniques! Thanks Tim and Susan!

Pocahontas


This is a page I really had fun making! When I saw the blue Saffron paper by K & Co. I had "Colors of the Wind" in my head. For some reason it just screamed Pocahontas to me. So, I cut out the windy swirls and set about making a page that fit this Native American Princess. This was a page that sat on my scrap table for a couple of days until I realized what it needed - beads! So off to the bead store for some beading needles and seed beads.

I decided to put beads in several locations. I threaded multiple beads onto the jute that is tied through the end of the journaling tag.


Then I poked holes through the paper with an awl and sewed the tiny seed beads all along the border of the brown paper. This added just the texture I was looking for. But It needed just a little more, so I cut out the butterflies and rolled their wings around a pencil to make them stand out. Then I attached a bead to each end of a 2" piece of wire and folded it in half to form the butterfly antennae. For the body I used a bit of Ranger Distress Stickles in Walnut Ink color. I used an EK Sucess sticker set for Pocahontas and the title and I was done. I love when a page is fun to put together and you like it when it's done!


Saturday, May 9, 2009

Baby Shower Invitations

I am admittedly not a card maker, so I know there is probably nothing original on these invitations, but I had a fun time making them and trying to be creative as I did it. My boss, Linda, asked me to help her with a couple of invitations for baby showers she is throwing. One is for her daughter, and another for her daughter's friend. I agreed and started looking around for inspiration.


The first invitation was for a boy. I had purchased a bunch of Daisy D's baby paper for some Ariel layouts - I thought the colors and circles went well with an under the sea feel. Anyway, I had some left over and thought it would be perfect for a rustic baby boy invitation. I had picked up ideas from layouts and other cards and decided to add them in. One was the corrugated heart on the front. I only had some bright yellow corrugated paper, so I mixed my paints and then painted all the paper, distressed it by sanding and scratching it, then I cut out the hearts and letters. To add a little texture, I sewed around the edges of all the hearts. I had to dye the twill and the bears for the inside. Then we sewed around the edges of all the papers and crinkled them. It took three of us two days to put these together and that was with all the elements cut, punched, painted, dyed, and ready for assembly.


Then on to the baby shower invitations for my boss's new baby granddaughter. I wanted these to have a warm, baby quilt, feminine, vintage feel to them. I used Basic Grey Two scoops for this card, and added lace, velvet ribbon, clear glass beads and some sewing. Instead of inking and crinkling, I decided to sand the edges of everything to give it a soft worn look. Then we sew just around the edges of the front and the inside of the invitation.


For the inside we decided to borrow an element from the first card, the heart and stork tag. But since the feel of this card was so different, I didn't think corrugated paper was what I wanted to use. So, I cut some different papers from the line and glued them on to card stock. Then I used a zig zag stitch to sew across all of the intersecting edges, horizontal, vertical and diagonal. Once that was done, I traced a heart onto the paper and cut out all the hearts, then sewed around the edges of each one with a straght stitch. I think the little quilted paper hearts are just the feeling and look I was hoping for.


These took three of us (four of us one night) three different evenings to finish. And again, that was with everything cut, printed, and prepped for assembly.

Despite all the work, we had a great time making these, and my boss was bitten by the scrapbooking bug. With all the techniques she used on these cards, she kind of got a baptism of fire into the realm of scrapbooking, but she loves it anyway!