Wednesday, February 27, 2013

Tattered Flowers Challenge Entry #2

 
I can't believe it!! Seriously!  I can't believe it!  So many amazing entries.  700 of them!  What a delightfully fun challenge -- one that no matter the outcome, everyone feels like a winner! Please check out the winners and leave some love on their blogs.
For my second entry for Tim Holtz's Tattered Floral Challenge I wanted to do something a little more masculine and totally different, so I thought about it and gathered up some things I had laying around my scrapbook room.  The only thing I had to go buy was the frame from Beverly's and a couple of trucks from the Dollar Tree.
 
Once I got back, I gathered my supplies and got started.  
 For the Tattered Floral part of the challenge, I cut flowers out of the die from wire mesh, old jeans, and old maps.  I tore the tires off of the cars as well. As you can see, the tires all have different colored centers, so I painted all of them with my Silver Paint Dabber.
 
Once the flowers were cut, I colored the mesh with Slate Alcohol Ink, and edged the map and denim flowers with Walnut Stain Distress Ink.  
To give the mesh flowers some texture, you can see that I bent and folded the mesh into petal shapes.  
For the map flowers, I spritzed them with water, crinkled them up into little balls, then slightly dried them with a heat gun and slowly uncrinkled them and dried them as I flattened them back out.  They end up slightly curling up and they have a crispy texture when they are dry.


To finish them off, I layered them, attached them with a glue gun and put a tire in the center of each one.
 I needed something to put my flower on and thought these would be cute on a frame.  So I found a map that had some good coloring on it and then cut it to fit the frame.  I have to pictures of this because I could have made a vertical or horizontal frame.  Just be sure that whichever you decide, that your map is going in the same direction.
 I didn't take a picture of it, but before adhering the map to the frame, I painted the sides and back of the frame with Vintage Photo Distress Paint.  I inked the entire map frame with Antique Linen Distress Ink and dried it.  Then I stamped the tire tracks from Tim's Road Trip stamp set in black soot and embossed them with Walnut Stain Distress Embossing Powder to give them texture. I adhered it to the frame with Claudine Helmuth Multi-matte medium, sanded the edges and inked the edges with Walnut Stain Distress Ink.
 Now I needed to embellish the frame with something other than just the florals.  I stamped the Route 66 sign, also from Tim's Road Trip stamp set, onto some Ranger Glossy Paper using black archival ink.  I scratched the sign in a couple of places, colored them with Vintage Photo Ink and then I went around the edges with it. I took the zig embossing pen and drew a few lines on the scratches and roughly went around the edges of the sign, then sprinkled a tiny bit of Vintage Photo Distress Embossing Powder on the sign and dried it with a heat gun.   I was going for "rusty gold."  (I love the pickers!)
 Here is how it turned out.  I think it looks like something Mike and Frank would buy on a pick, so I was pleased.  I didn't like the black dots though so I did heat some Ideaology mini brads with the heat gun, dipped them in the distress powder and embossed them so they looked like rusty nails and then stuck it to a very thin piece of balsa wood I cut and stained with Distress Stains.  I think it was just what it needed.
Now the top corner of the frame needed something, so I decided to fix up a really old license plate I had in my stash.  I think this might have been from Junkitz?

I cut the letters out with my Cricut in SCAL and used the fonts used on the California License Plates.  I glued the paper on the plate, and then covered it with a layer of Rock Candy Distress Crackle Paint(Have you figured out what it says yet?  Hint: Tim's motto)
Then I did the whole ink and embossing powder thing to make it look old and rusty.  I added some screw-head brads from Michael's Recollections line, but colored them with Vintage Photo Distress paint and embossing powder to make them look rusty.
Once I had all the embellishments completed, I put them all together on the frame and this was the finished project. 
It's just perfect for our picture of Ornament Valley and Cadillac Ridge in Cars Land. 

Thanks for the challenge Tim!  If you hadn't challenge us to make something different with this die, I wouldn't have made this frame for one of my favorite Cars Land pictures. 


Sunday, February 24, 2013

Tattered Flowers

This is my entry for the Tim Holtz Tattered Floral Challenge.

I used cream burlap, canvas, organza, Spun Sugar and Victorian Velvet Distress Paint, Rock Candy Glitter, Glossy Accents and an Ideaology button.

First I pounced some Distress paint on the fabrics, then I spritzed them with water and scrunched them up.  The scrunching mixed the paints and squeezed excess water and paint out of the fabrics. I have three fabrics here, but I did not paint the organza, the very pink fabric below is white crinoline that I used with the organza to make flowers for something else.  The crinoline is what is pictured in all of the steps below.

Then I started drying them while they were scrunched.

It is basically the same drying technique you use when drying the seam binding ribbon to tie on the top of tags.  I slowly unscrunched and rescrunched until the fabric was dry and crinkley.


Pictured on the left is the cream burlap, the center is the cream canvas, and on the right is the white crinoline.  I ended up not being able to use them together because even though I used the same exact paint mixture of Victorian Velvet and Spun Sugar, the difference between the base colors of white and cream really made a difference in the outcome.

Then I ironed the burlap onto some paper-backed fusible web.  I find that this helps the burlap keep it's shape.  I love the texture of the burlap, but am a little different than Tim in that I don't like when it frays so much that it loses it's shape.

Then I cut all of the fabrics out of the Tattered Florals die.  I layered them and put one stitch in the center to hold the layers together.

In a separate little metal lid, I mixed Glossy Accents and Rock Candy Glitter to make my own stickles. Then I brushed it on the tips of the flower layers and dried them one at a time with the heat gun.  At the end I spritzed it with water and dried it and the heat caused it to curl up.

My last thing was to take one of the idealogy buttons and put some Antique Linen and Spun Sugar Distress Paints on the button and then wipe off the excess leaving a little color in the crevices.

I love this flower!  It fits perfectly on some painted thrifts store books that I used for my Valentine and Spring decor this year.


Wednesday, February 20, 2013

Love is the Key

 THIS IS NOT MY DESIGN
The second layout for the monthly class I am taking was a Valentine theme using Authentique paper.  Seeing as we don't usually celebrate Valentine's Day, I didn't have any pictures to put on this.  So, I made reservations at the Carthay Circle Restaurant in Disney's California Adventure park and DH and I went down during their True Love celebration.

 The key hanging is a very cute detail as are the heart pins.  I also loved the word search paper background.
 The rolled tops of the strips give some nice texture.  It was fun filling the little envelope at the side with lots of embellishments.
 We gave these die cut flowers some texture by spritzing them with water, crinkling, and then drying with a heat gun before we layered them.
 Here is a close-up of the little envelope filled with goodies.

It is so nice just to go and let someone else do the design work!  I get to just enjoy scrapping.  It's wonderful!!

Saturday, February 9, 2013

Valentine's Decor I - Burlap, Black and Pink Banner and Tags

I normally don't decorate for Valentines Day.  It's just not something we usually celebrate.  It seems like prices for everything "romantic" get so inflated in February that it sapped the fun out of the whole idea for us early in our marriage.  I'm not a jewelry kinda girl, and although I love flowers, long ago, I told him not to pay the exorbitant prices during February.  We don't even get each other cards.  Both of us are totally fine with this.  I'd rather save the money and buy more scrapbook stuff when it comes on sale. (truth!)

So don't ask me what possessed me to decide to decorate for Valentines Day this year.  I have no idea.   But I'm doing it. So here are some of my decorations so far.  This may need to come in installments since some of it is taking me a little longer than expected.  If I don't finish by the 14th, no biggie.  I'm leaving it all up through the end of February.

First, I decided to start with four tags -- I have a spot on my living room wall where I hang four 5x7 frames with something in them.  For Valentines I decided to make 4 tags.  Here are the close -ups.
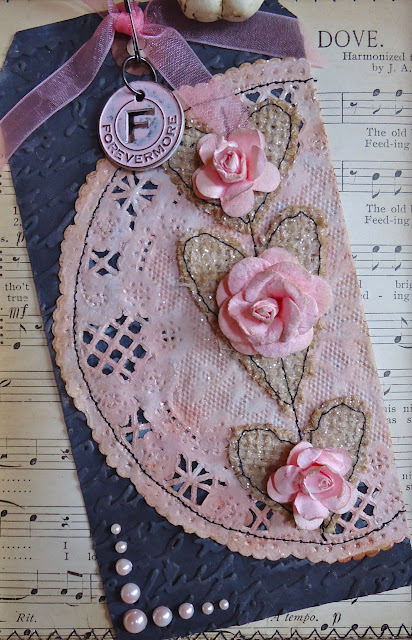
 Burlap, black embossed tag, pink pearls, pink inked doily, rock candy glitter, pink inked roses, pink painted Tim Holtz charm.
 Pink painted and embossed manila tag, prima flower, burlap, pink lace and velvet ribbon, cherub button, heart pins, pink painted Tim Holtz word tag
 Black tag, Tim Holtz stamp in pink paint, pink prima flower, burlap hearts, pink lace, pink pearls, pink painted and rock candy stickled Prima frame, cherub button, pearl heart pins.
 Burlap, pink lace, pink velvet ribbon, dyed leaves and dyed black roses with rock candy glitter, cameo button, pink painted tag.

In order to mount them, I needed frames. I bought four plastic frames from the Dollar Tree.  I painted them cream with Annie Sloan Chalk Paint, and then aged them with three coats of wax - clear, dark and then another clear coat.
 Before I painted them I wanted to add something that was Valentiney, and I had found a baggie of old curtain hooks with cherubs on them at a thrift store.  I cut the hooks off and glued one on the top of each frame.  Then I painted and aged with the wax.

Here are what the tags look like in their respective cherub frames.

Of course, none of my home decor would be complete without a banner for the fireplace.  I had a vision of what I wanted, and this wasn't quite it.  Once I got this made and hung, I decided it was too symmetrical, but it's ok for my first Valentine's Banner. 


I added a few junk bows to soften the edges a little and decided to call it good.  
One thing I do really like is the combination of the burlap, black and soft pink organza and velvet. 


That's as far as I've gotten with the decor, but stay tuned for a wreath, the kitchen mantle, living room mantle, and entrance table.  Yes, I have a lot to do.