Monday, January 30, 2017

Creativation 2017 Card Samples Part 2

Tim Holtz and Stampers Anonymous are releasing Tim's stamps in three sets.  The stamps that are currently shipping in January are:
Hipster
Motivation1, 2, 3
Mini Motivation
Brushstrokes
So with that in mind, I decided to do a quick post today with the Motivation stamps and Brush Strokes. Then I'll do my Hipster cards tomorrow with a photo tutorial.

This first card is very simple and doesn't need a photo tutorial. Choose 5 Distress Ink Colors in the same family. I chose 5 in the purple family. Pick one of the linear Brushstrokes CMS293 stamps, ink it up, spritz with water and stamp it on a piece of Distress Watercolor Cardstock. Repeat with the other 4 colors and your background is complete. The Motivation I CMS289 sentiment was colored with purple Distress Markers, then I breathed on it to reactivate the inks and stamped it on a piece of Distress Watercolor Cardstock.  I really like the way the lettering isn't solid on the sentiment so it looks worn and distressed.  To finish it off I added some Mirrored Stars.

 This second card I'm not going to do a tutorial on the textured background because I will do that with tomorrow's Hipster cards. I'll just say that I used the large Stone THS086 Layering Stencil, Grit Paste, and Distress Crayons to color it.
For the sentiment from Motivation 2 CMS290, I stamped the Pine background from the Birch and Pine  CMS280 onto a piece of Distress Multi Media Cardstock in Ground Espresso Distress Ink and colored in the background lightly with a blending tool and various brown Distress Inks.
On top of the background, I stamped the motivation using my Misti (I don't have one of these Tim Holtz Stamp Platforms yet!) and inked up the words with the Distress Ink colors I wanted and I inked stamped and inked until each word stood out nicely.
 Well, I love Disneyland! I'm a California girl born and raised and Disneyland is one of my favorite places to visit. Thankfully I live in Southern California so I have an annual pass and have the pleasure of visiting often. In fact, I'm actually a scrapbooker at heart and love scrapping my Disney memories. That being said, I don't like to use Disney papers and embellishments to scrap my photos. I tend to see Disney in just about everything and prefer using the unexpected for my Disney pages.

All that to say, when I saw this Mini Motivation CMS292 sentiment, the two circle Brushstrokes CMS293, and the Scribbles and Spirals CMS296 I knew this card had to be made. I couldn't NOT make this card! 
I began by rolling Candied Apple Distress Paint onto the large circular brushstroke stamp with a brayer, then stamping it in the middle of a piece of Distress Specialty Stamping Paper with the bottom edge bleeding off the paper. Then repeat twice with the small circular brushstroke. Stamp the smaller circles on each side of the large one to for a classic Mickey shape. While the paint is drying, clean your brayer and stamps immediately. I just use water and a Rub-it Scrub-it pad from Ranger. It gets down into all the crevices and cleans the paint out of the stamp nicely.

Once the paint is dry, ink up the Scribbles stamp with Mustard Seed Distress Ink and stamp it over the whole background.  (I used the Spiral Stamp in this picture, but the Scribbles stamp on the actual card.) Once it is dry, lightly color in the rest of the background with a blending tool and the Mustard Seed Distress Ink

Using a slightly dampened paper towel or tea towel, wipe any ink off of the stamped painted image.
To make the black band, I took a piece of Distress Specialty Stamping Paper and placed it under the small scribbles layering stencil from the Mini Stencils 24 MTS024. Then I inked over it with Black Soot Distress Ink.

I stamped the Mini Motivation on a piece of Distress Specialty Stamping Paper with Black Soot Distress Ink. I added four Star Fasteners in the corners of the card to complete it.


The last card was inspired by seeing my Distress DIY Custom Ink Pad sitting in my ink storage case. I thought it went perfectly with this quote from the Motivation 3 CMS291
I began by using the same ink colors I had used on my ink pad, Wild Honey, Abandoned Coral, Festive Berries, and randomly inking up the Spirals stamp from Scribbles and Spirals CMS296.
Then I spritzed it with water and stamped it on a piece of Distress Watercolor Cardstock. 
Using a blending tool, I blended the same colors into the back ground.
Then I sprinkled it with water drops using my Distress Sprayer and dried it.
I got out another piece of Distress Watercolor Cardstock and using a Blending Tool I colored it with Festive Berries. You want it to be fairly saturated, but not as saturated as it would be with Distress Stain. 
 Then using the large Heartstruck THS073 Layering Stencil, I spritzed the back with plain water using my Distress Sprayer and laid it directly on the paper. I pressed down on it with a dry tea towel, then picked up the stencil and let the water do its work. 
After waiting several seconds or so, I blotted the water off with my dry tea towel and then dried it with a heat tool.

To get the stamped image in varied colors like this you first have to make a Distress DIY Custom Ink Pad. Tim has this fantastic tutorial on how to make one.  Once you have your own Distress DIY Custom Ink Pad made, you ink up your stamp. Because these stamps are larger than the ink pad, you have to think before you ink.  First you ink one end of the stamp, then turn your ink pad 180 degrees and you ink the other end of the stamp. That way the same color is in the middle each time you are inking. See how on my image the Wild Honey is on the top and bottom and then is blends into the Abandoned Coral and then Festive Berries in the center.

To complete my card, I colored some Mirrored Hearts with Butterscotch Alcohol Ink.

Although each card had several steps to it, they were all very simple to make and went together fairly quickly.


Sunday, January 29, 2017

Creativation 2017 Card Samples Part 1

I had so much fun creating some cards for the Stampers Anonymous Tim Holtz Stamps at CHA Creativation 2017.  Today I'm posting two of the cards I made with a quick photo tutorial on how I made each one.

First, I gathered a whole bunch of my Distress supplies so that whatever idea or vision took hold, I would be ready.
For the first card, I was taken with the florals in the Illustrated Garden CMS295 and wanted to do something soft and vintagey.
I started by making a soft Spun Sugar background using the Vines and Roses CMS298 background stamp. I inked the stamp with Spun Sugar Distress Ink, then spritzed it lightly with water, and stamped it on Distress Mixed Media Heavystock 
I dried it with a heat tool and lightly colored in the rest of the background with Spun Sugar Distress Ink and a Blending Tool. I added a tiny bit of Pumice Stone Distress Ink in a few places just lightly and edged with Ground Espresso Distress Ink. The lighter spots are just from spritzing drops of water on the background using the Distress Sprayer
The next few steps I'm going to show you with different colors than the ones I used on the card, but the technique is the same.
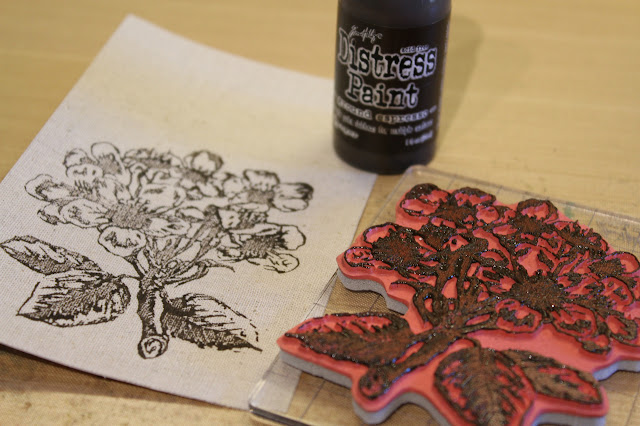
I wanted to stamp on linen, so I cut a piece of linen from the Ideaology Textile Surfaces and chose to use Ground Espresso Distress Paint to stamp the image. 
You want to use a brayer to get the paint evenly spread onto the stamp, then just press the stamp onto the linen. You will want to wash your stamp right away. I use water and a Rub-it Scrub-it pad from Ranger and my stamps clean right up.
Once the paint is dry, then I picked some Distress Crayon colors that I liked for the project.

Scribble the Distress Crayons onto the Non-stick Craft Sheet, and using a Tim Holtz Water Brush, begin to water color the image. I dried mine often so I could see the color when the linen was dry. Water coloring with the Distress Crayons gives something a completely different look than with the inks or markers because the color has an opacity to it.

Here is a close up of the completed piece.  The texture of the linen goes perfectly with this stamp to give it a very vintage fabric feel. 
Here is a close-up of the pink floral.

For this second card the technique is fairly simple, it just takes a little patience, but it's worth it! This card is one of my favorites!
Again, with the technique pictures I'm going to show you with different colors so you can see how it looks, but the technique is the same.
Gather Distress Watercolor Cardstock, I used the vine background from the Vines & Roses CMS298 stamp set, and Distress Markers in various colors.
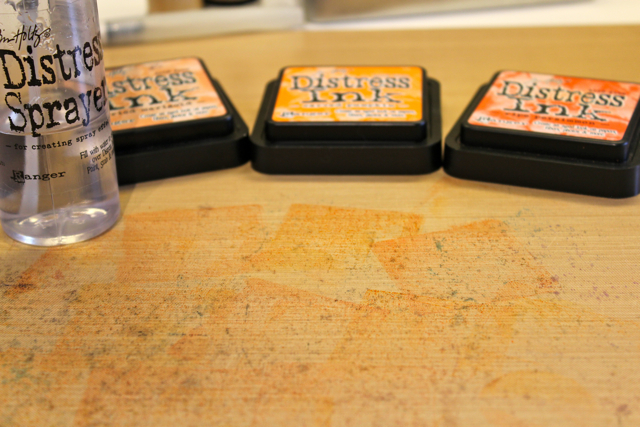
First you need to make a light background color. For this sample I decided to try an orange background. Using Distress Ink pads, pounce some color onto a Craft Sheet.
Spritz the ink with water until it beads up.
Swipe the smooth side of the Distress Watercolor Paper through the wet ink once, dry, then repeat. Remember not to do it too much for this technique since we want to keep the background light. Dab off any areas where it pools with a dry paper towel or flour sack towel.
Once it is dry you will see that some areas are a little darker than others and that's ok. We like that!
Now you get to color! Using your Distress Markers, color directly onto the stamp. Don't worry about the ink drying, just color the flowers, leaves and vines, flower centers, etc until you have the entire
stamp colored.
Next spritz the stamp a couple of times with water from the Distress Sprayer to reactivate the ink and also to make the stamp look like you watercolored the image.
 Stamp directly onto the background and dry immediately.  Voila!
I really love the soft beauty of the image with this technique.  I could just keep making pretty backgrounds all day with this stamp!

That ends Day 1 of my Creativation Card Samples. I'll be back on tomorrow with more.

Tuesday, January 17, 2017

CHA Creativation Project Sneak Peeks

Hi everyone!
I have a bunch of great projects from last fall to post but those can wait a little longer! The last few weeks I have had such a great time designing some sample cards for Tim Holtz's Stampers Anonymous Winter 2017 Release for CHA- Creativation 2017.

To see the live Facebook release and images of all the stamps, be sure to visit Tim's blog. You really don't want to miss it! And the Day 2 stencil releases can be seen here.

I'll be posting my cards once CHA actually begins with technique info, stamp and stencil names, but for now I can at least share sneak peeks with you.  Enjoy!